
TYPO3 insider Scoop - 2024 April Edition
TYPO3 News
If you are using TYPO3 and want to build your own custom TYPO3 element, look no more. Luckily, it’s easy to create custom content elements in TYPO3 following some simple steps.
![How To Create Custom Element In TYPO3 [Ultimate Guide]](/fileadmin/ns_theme_ns2019/blog/live/TYPO3_Content_Element/How_To_Create_Custom_Element_In_TYPO3__Ultimate_Guide_.jpg)
If you are using TYPO3 and want to build your own custom TYPO3 element, look no more. Luckily, it’s easy to create custom content elements in TYPO3 following some simple steps.
TYPO3 custom elements are the basic needs for developing TYPO3 websites. Although, the TYPO3 core provides a number of built-in elements. But, custom TYPO3 site development will need a special kind of customized TYPO3 element. As a TYPO3 developer, you should know the best practices.
In this blog post, we will guide you on how to create custom TYPO3 elements in the way you want them to be.
If you wonder why we don’t install an extension instead of creating our own custom TYPO3 element, it is because page speed is important. Every extension that we install comes with extra CSS and JS files. Those can affect your TYPO3 performance. On top of that, we want to have tight control over the design of our components.
TYPO3 also allows developers to create their own custom TYPO3 content elements.
The widgets/elements created by the user in a custom manner are called TYPO3 Custom Elements.
TYPO3 Core elements contain pieces of code that are available by default you can add to your website.
Think of them as modules that you can use to add different elements by using a simple select and edit option.

A content type for TYPO3's page module is characterized by various settings. We'll guide you through the stages that need to be followed to build a content element with the desired design and ease of use to help content editors. We'll add code and settings at the TYPO3 backend as follows:
Now, let’s look at each step in detail.
First, we need to define the key of the new content element type.
Next, the key needs to be added to the select field CType. This will make it available in the Type dropdown in the backend.
The following call needs to be added to the file Configuration/TCA/Overrides/tt_content.php.

// typo3conf/ext/myextension/ext_localconf.php
$iconRegistry = \TYPO3\CMS\Core\Utility\GeneralUtility::makeInstance(\TYPO3\CMS\Core\Imaging\IconRegistry::class);

// use same identifier as used in TSconfig for icon
$iconRegistry->registerIcon(
   // use same identifier as used in TSconfig for icon
   'my-icon-identifier',
   \TYPO3\CMS\Core\Imaging\IconProvider\FontawesomeIconProvider::class,
   // font-awesome identifier ('external-link-square')
   ['name' => 'external-link-square']
);

// typo3conf/myextension/Configuration/TCA/Overrides/tt_content.php
\TYPO3\CMS\Core\Utility\ExtensionManagementUtility::addTcaSelectItem(
   'tt_content',
   'CType',
    [
        'LLL:EXT:myextension/Resources/Private/Language/Tca.xlf:myextension_newcontentelement',
        'myextension_newcontentelement',
        'my-icon-identifier',
    ],
    'header',
    'after'
);
In case if a custom content element needs to modify the database, a file ext_tables.sql needs to be added to the extension. The syntax is SQL, and even though we are adding a field to an existing table, we use the CREATE TABLE syntax.
For example, if we want to display options that take value options from a dropdown, editors can easily specify an input value for the formula. For our custom content type, we add a field user_value to the table tt_content.
And this is how our ext_tables.sql file looks:
CREATE TABLE tt_content (
    code_language text DEFAULT '' NOT NULL
);
TCA is the configuration layer on top of the database that TYPO3 works on. The TCA holds configuration options for database fields and tells the system how to display a specific field and its value or value options to backend users in various forms.
For demonstration, we will add three things to the TCA for the table “tt_content”. All configuration is included in the file Configuration/TCA/Overrides/tt_content.php:
Add a new field as a select element. The values a backend user can select are generated from a separate DataProvider (see Classes/DataProvider folder) utilizing the use of TYPO3 Core’s ExtensionManagementUtility to add the new field configuration to the TCA for tt_content:
// Add dropdown for code language to TCA.
$additionalColumns = [
    'code_language' => [
        'label' => 'LLL:EXT:codeblock/Resources/Private/Language/locallang_db.xlf:tt_content.code_language',
        'config' => [
            'type' => 'select',
            'default' => '',
            'itemsProcFunc' => 'NITSAN\\Codeblock\\DataProvider\\CodeLanguages->getAll',
            'renderType' => 'selectSingle',
        ],
    ],
];

\TYPO3\CMS\Core\Utility\ExtensionManagementUtility::addTCAcolumns('tt_content', $additionalColumns);

\TYPO3\CMS\Core\Utility\ExtensionManagementUtility::addToAllTCAtypes(
    'tt_content',
    'code_language',
    'codeblock',
    'before:bodytext'
);
Adding Content-Type to the list of available Content Types
We’ve used ExtensionManagementUtilty API to modify the TCA configuration for the field “CType '' and add our new content type to the list.
\TYPO3\CMS\Core\Utility\ExtensionManagementUtility::addTcaSelectItem(
    'tt_content',
    'CType',
    ['LLL:EXT:codeblock/Resources/Private/Language/locallang_db.xlf:tt_content.CType', 'codeblock', 'content-codeblock'],
    'html',
    'after'
);

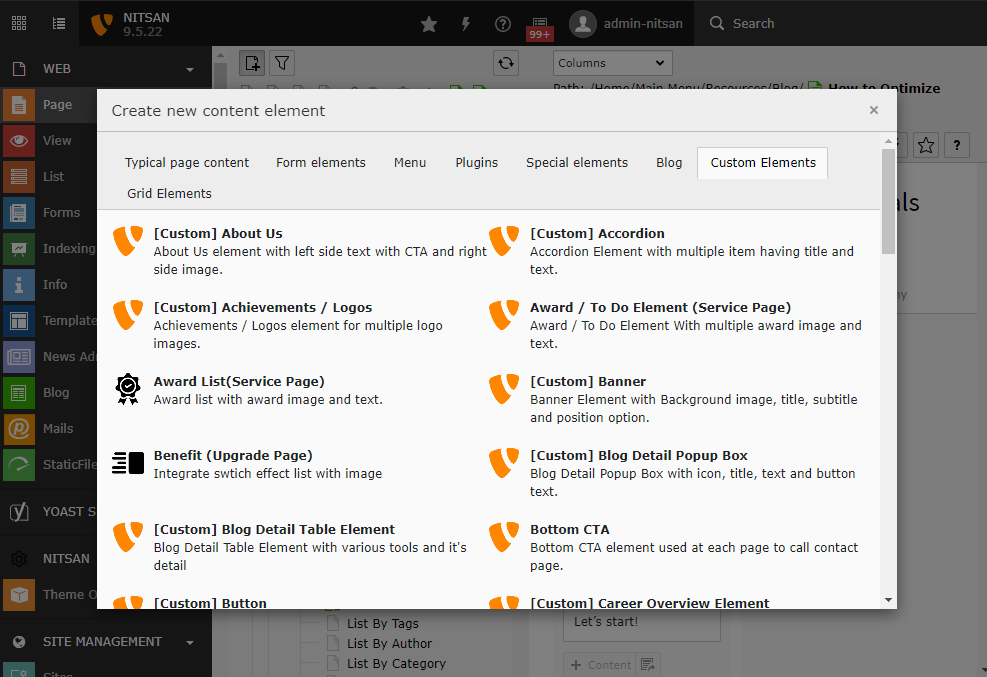
To add selectable TYPO3 content elements to the “New Content Element Wizard” you have to use a few lines of PageTS.
Configuration/PageTs/PageTs.tsconfig:
mod.wizards.newContentElement {
    wizardItems {
        common.elements.codeblock {
            title = LLL:EXT:codeblock/Resources/Private/Language/locallang_db.xlf:tt_content.CType
            description = LLL:EXT:codeblock/Resources/Private/Language/locallang_db.xlf:tt_content.wizard.description
            tt_content_defValues.CType = codeblock
            iconIdentifier = content-codeblock
        }
        common.show := addToList(codeblock)
    }
}
PageTs.tsconfig
To make use of an iconIdentifier you have to register the icon first,


// typo3conf/myextension/ext_localconf.php
// Register for hook to show preview of tt_content element of CType="myextension_newcontentelement" in page module
$GLOBALS['TYPO3_CONF_VARS']['SC_OPTIONS']['cms/layout/class.tx_cms_layout.php']['tt_content_drawItem']['myextension_newcontentelement'] =
   \Vendor\myextension\Hooks\PageLayoutView\NewContentElementPreviewRenderer::class;
// typo3conf/myextenison/Classes/Hooks/PageLayoutView/NewContentElementPreviewRenderer.php
namespace Vendor\MyExtension\Hooks\PageLayoutView;
use TYPO3\CMS\Backend\View\PageLayoutView;
use TYPO3\CMS\Backend\View\PageLayoutViewDrawItemHookInterface;
class NewContentElementPreviewRenderer implements PageLayoutViewDrawItemHookInterface
{
    /**
     * Preprocesses the preview rendering of a content element of type "My new content element"
     *
     * @param \TYPO3\CMS\Backend\View\PageLayoutView $parentObject Calling parent object
     * @param bool $drawItem Whether to draw the item using the default functionality
     * @param string $headerContent Header content
     * @param string $itemContent Item content
     * @param array $row Record row of tt_content
     *
     * @return void
     */

    public function preProcess(
        PageLayoutView &$parentObject,
        &$drawItem,
        &$headerContent,
        &$itemContent,
        array &$row
    ) {
        if ($row['CType'] === 'myextension_newcontentelement') {
            $itemContent .= '<p>We can change our preview here!</p>';
            $drawItem = false;
        }
    }
}
Data processors can be used for some data manipulation or other actions you would like to perform before passing everything to the view.
You can find the full file in Classes/DataProcessing/HighlightProcessor.php.
We use the value of a specified field ($processorConfiguration['field']), and process it using highlight.php and return a formatted version of the value to be used in the frontend output.
public function process(ContentObjectRenderer $cObj, array $contentObjectConfiguration, array $processorConfiguration, array $processedData)

{
    $fieldName = $processorConfiguration['field'];
    $targetVariableName = $cObj->stdWrapValue('as', $processorConfiguration, 'bodytext_formatted');
    $highlight = GeneralUtility::makeInstance(Highlighter::class);

    // Let highlight.php decide which code language to use from all registered if "detect automatically" is selected.
    if (!$processedData['data']['code_language']) {
        $languages = $highlight->listLanguages();
        $highlight->setAutodetectLanguages($languages);
        $highlighted = $highlight->highlightAuto($processedData['data'][$fieldName]);
    } else {
        $highlighted = $highlight->highlight($processedData['data']['code_language'], $processedData['data'][$fieldName]);
    }
    $processedData[$targetVariableName]['code'] = $highlighted->value;
    $processedData[$targetVariableName]['language'] = $highlighted->language;
    $processedData[$targetVariableName]['lines'] = preg_split('/\r\n|\r|\n/', $highlighted->value);
    return $processedData;
}
To have TYPO3 output anything in the frontend, we need to tell it what to do when it attempts to render a content element of type “codeblock”. We extend the TypoScript configuration for tt_content with our custom content type configuration in Configuration/TypoScript/setup.typoscript, adding the configuration for dataProcessing to our element configuration to process the value of the “bodytext” field:
tt_content.codeblock =< lib.contentElement
tt_content.codeblock {
    templateName = Codeblock

    templateRootPaths.0 = EXT:codeblock/Resources/Private/Templates
    dataProcessing.1567071612 = NITSAN\Codeblock\DataProcessing\HighlightProcessor
    dataProcessing.1567071612 {
        field = bodytext
        as = bodytext_formatted
    }
}
As the last step, we need to create the Fluid template to render the content in our frontend. The Fluid template name and folder are defined in the TypoScript setup above and can be found at Resources/Private/Templates/Codeblock.html.
<f:layout name="Default" />
<f:section name="Main">
<pre>
<code class="hljs {bodytext_formatted.language}">
{bodytext_formatted.code -> f:format.raw()}
</code>
</pre>
</f:section>
Well, you can have a backend preview of your created TYPO3 custom element in two ways,
Let’s understand how to have a standard and customized backend preview.
Using Fluid template via PageTSconfig
We can simply specify a fluid template to be rendered as preview in PageTSconfig:
mod.web_layout.tt_content.preview.fs_slider = EXT:fluid_styled_slider/Resources/Private/Templates/Preview/content-codeblock.html
This template will receive all fields of the tt_content row directly. So {header} contains the header, {bodytext} contains the bodytext and so on.
Custom Backend Preview With “Classic” Page Module
If you want to generate a special preview in the “classic” backend Web > Page module, you can use a hook for this:
// Register for hook to show preview of tt_content element of CType="yourextensionkey_newcontentelement" in page module
$GLOBALS['TYPO3_CONF_VARS']['SC_OPTIONS']['cms/layout/class.tx_cms_layout.php']['tt_content_drawItem']['content-codeblock'] = \Vendor\YourExtensionKey\Hooks\PageLayoutView\NewContentElementPreviewRenderer::class;
According to the used namespace, a new file Classes/Hooks/PageLayoutView/NewContentElementPreviewRenderer.php has to be created with the following content:
<?php
namespace Vendor\YourExtensionKey\Hooks\PageLayoutView;
use TYPO3\CMS\Backend\View\PageLayoutView;
use TYPO3\CMS\Backend\View\PageLayoutViewDrawItemHookInterface;
/**
 * Contains a preview rendering for the page module of CType="content-codeblock"
 */
class NewContentElementPreviewRenderer implements PageLayoutViewDrawItemHookInterface
{
    /**
     * Preprocesses the preview rendering of a content element of type "My new content element"
     *
     * @param \TYPO3\CMS\Backend\View\PageLayoutView $parentObject Calling parent object
     * @param bool $drawItem Whether to draw the item using the default functionality
     * @param string $headerContent Header content
     * @param string $itemContent Item content
     * @param array $row Record row of tt_content
     *
     * @return void
     */
    public function preProcess(
        PageLayoutView &$parentObject,
        &$drawItem,
        &$headerContent,
        &$itemContent,
        array &$row
    ) {
        if ($row['CType'] === 'content-codeblock') {
            $itemContent .= '<p>We can change our preview here!</p>';
            $drawItem = false;
        }
    }
}
You can utilize any of the methods to generate a back-end preview according to your requirement. Also generating backend preview is optional but from the editor’s perspective, it is good to have a custom and clear backend preview.
Thanks for reading my article!
I hope you learn and explore to create TYPO3 custom elements with TYPO3-core ways. Let's quickly recap.
What’s your favorite way to create TYPO3 custom elements? Or, Do you have any questions or issues to create a TYPO3 core way custom element? I'll be happy to receive your comment below in the comment box.

I bring strong exposure and experience of software operations, marketing, project strategies, and game-changing partnerships to my position as a CEO of NITSAN & T3Planet. I am the face responsible for driving the venture's growth and development as the company continues to expand. I'm a technocrat and a Quick Learner with 13+ years of experience in the IT industry!


Comments and Responses